Drawings are essential to almost every patent application. It’s rare to see a patent application that doesn’t contain some kind of technical drawings, even if it’s just a flow chart.
The US Patent and Trademark Office (USPTO) informs us: “A design patent application is required to contain drawings if drawings are necessary to understand the subject matter to be patented.”
The European Patent Office (EPO) emphasizes drawing quality: “Good-quality drawings are very important for the correct disclosure of the invention.”
When seeking patent protection, ensuring the precision and clarity of US Patent Drawings is essential for successful applications.
Alternatives for Creating Patent Drawings
You have four different alternatives for getting your patent drawings done:
- Do them yourself by hand
- Do them yourself using patent drawing software
- Have your patent attorney take care of this
- Hire someone yourself to create your patent sketches
The easiest (and most expensive) way to get your drawings done is to just have your lawyer take care of it. In addition to choosing a vendor that’s convenient and not necessarily low cost, your attorney will likely add a markup to the price of the drawing. Hiring a patent drafting service provider yourself will save you money and time compared to going through your lawyer. The lowest cost alternative of course is to make the patent drawings yourself. If you choose to go that route, you might want to take a look at our article Ten Patent Drawing Software Packages.
Patent Drawing Specifications
Every patent office has its own rules for patent drawings. In this section, we’ll provide a summary of the patent drawing rules for USPTO nonprovisional utility patents drawings as an example.
Before you create design drawings, it’s important to familiarize yourself with the specific requirements for the specific type of application and specific patent office.
The patent drawing rules were first created many years ago; the requirements most readily fit mechanical inventions. The rules (such as drawings must be in black and white) are not necessarily suited to some newer types of patents, such as in the biomedicine arena, where the “drawings” may be scientific data.
It’s a challenge to present a complex chart all in black and white drawings. In the USPTO it is possible to submit color drawings, but you first have to file a petition to get permission to submit color sheets of drawings, and you have to pay a fee.
The full details this summary is based on can be found on the USPTO website in their Nonprovisional (Utility) Patent Application Filing Guide
US Patent and Trademark Office Rules (US Patent drawings rules)
We follow Patent drawing rules as mentioned below:
Color: United States Patent Drawings must be in black and white.
Paper size: 8.5” x 11” (21.6 x 27.9 cm)
Margins: Top 1” (2.5cm), left 1” (2.5cm), right 5/8” (1.5cm), bottom 3/8” (1cm). India ink or equivalent solid black lines.
Printed patent shouldn’t be submitted. Instead, sheets should be submitted electronically in PDF. Which means making patent drawings by hand should be scanned into PDF (this is because drawings created electronically may have a quality advantage)
Numbering: Sheets may be numbered with consecutive Arabic numerals placed in middle of the top of the sheet, or right-hand side. Number of sheets are also indicated, e.g., “1/5.”
Views are numbered in consecutive Arabic numerals, preferably in the order in which they appear on the drawing sheets. View numbers are preceded by “FIG;” e.g., “FIG 1.” Where there’s only one view, leave off the numbering.
Reference characters: Don’t include any reference characters that aren’t actually referenced in the description. Numerals are preferred.
Must have a print size of at least 1/8” (.32cm). Don’t cross or mingle lines. If the same part of an invention appears in more than one view, it must always use the same reference character.
Lead lines (lines between the reference character and the details referred to): Straight or curved, as short as possible. Lines can’t cross each other.
If the reference character is to the section within which the character is placed, underline to indicate you didn’t simply forget the lead line. Arrows may be used providing they are clear in meaning.
Identification of drawings. If you include identifying indicia, include title of the invention, inventor’s name, application number (if known), docket number (if any), all in the top margin of each sheet.
Graphic forms: The USPTO specifies: “Chemical or mathematical formulas, tables, computer program listings, and waveforms may be submitted as drawings and are subject to the same requirements as drawings.” See the application filing guide for more details.
Views: Include as many views as required to show the invention. You can use plan, elevation, section, or perspective views. You can use detailed views at a larger scale.
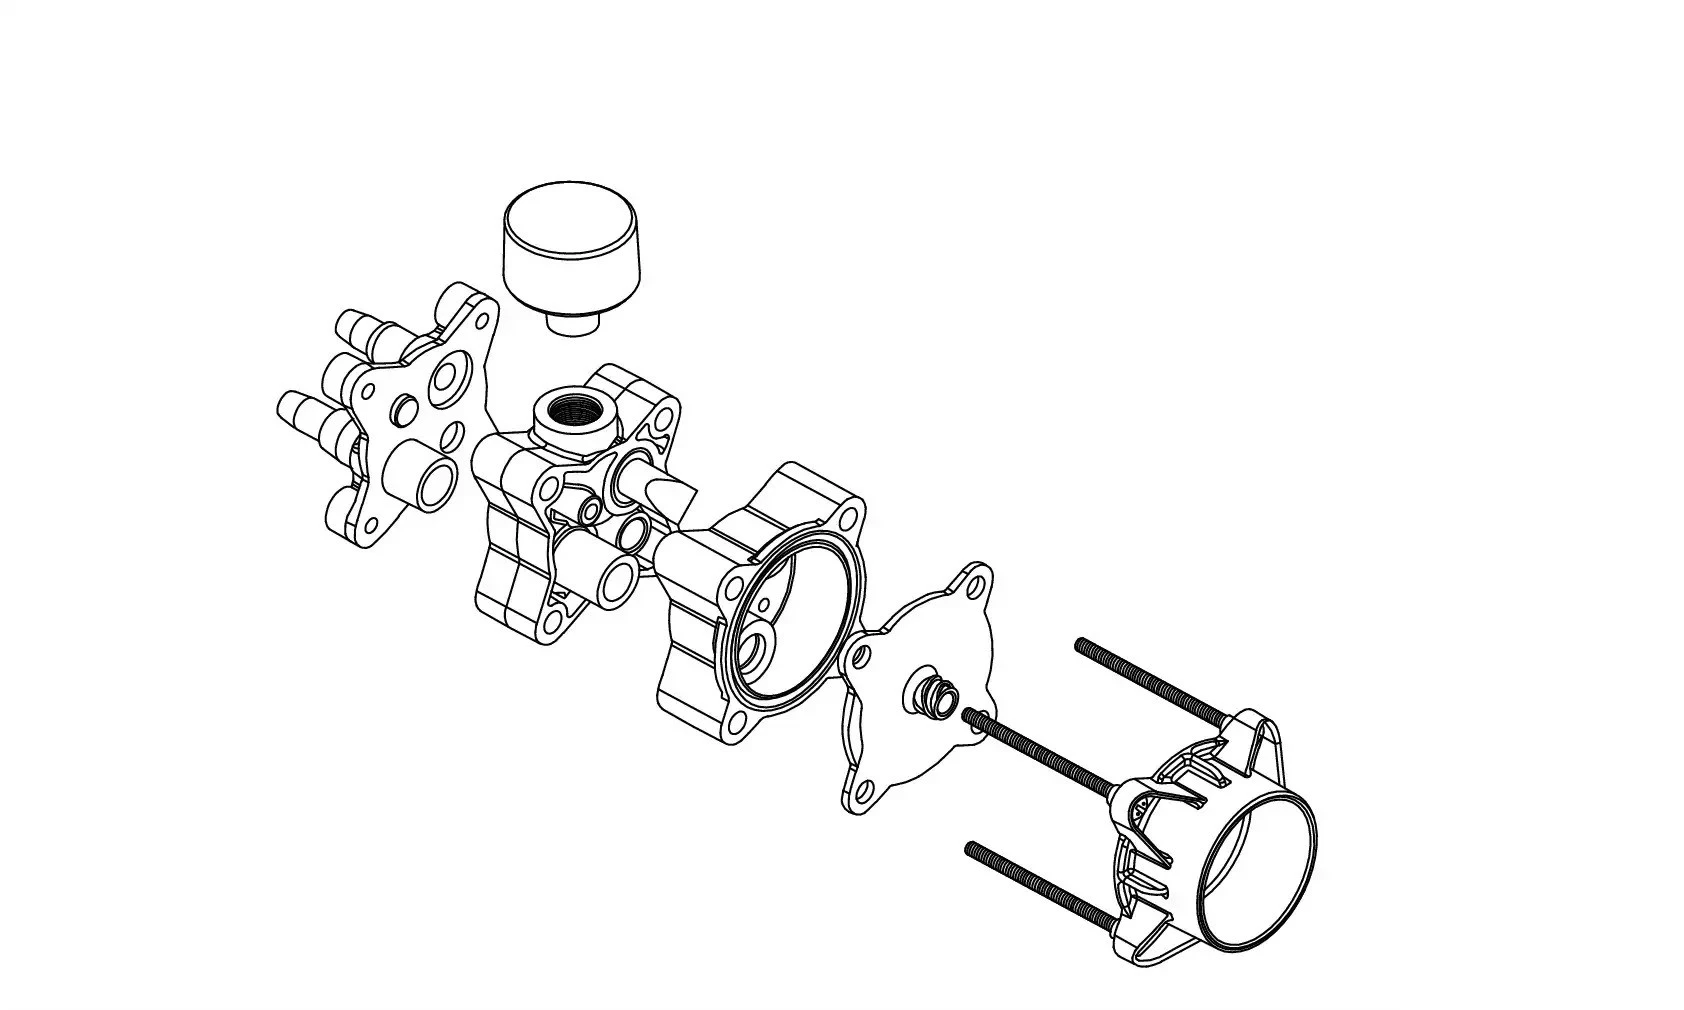
There are rules for how to group your views. Exploded views are also permissible. If an exploded view is on the same sheet as a conventional view, it should be in brackets.
Partial views: Very large machines or devices can be illustrated in partial view on either a single sheet or multiple sheets. If they are on more than one sheet, you should be able to arrange sheets so the complete figure can be assembled.
Sectional views : These are indicated with a broken line from the view for where the section is cut. Hatching is used to indicated sectioned portions of an object.
Alternate positions: These are shown with either broken lines or a separate figure view.
Arrangement of views: Views cannot overlap, on the same sheet should all be oriented in the same direction, and if possible placed so that they can be read with the sheet in an upright position.
Front page view: One view should be suitable as the main illustration of the patent.
Scale: Should be big enough so that drawings are still legible at 2/3 scale; do not indicate “actual size,” “scale 1/3,” etc., as they lose meaning if the drawing is reproduced at a different size.
Legibility: All drawings must have lines, letters, etc., created in a way that they still look satisfactory when being reproduced.
Shading: Shading is encouraged where it aids in understanding the invention without harming legibility.
Symbols: Symbols need to be identified in the specification. Wherever possible use symbols that are universally understood and generally accepted in the relevant art.
Legends: These may be used where helpful, containing as few words as possible.
Copyright or Mask Work Notice: These notices may be included. Specific language must be included in the specification and in drawing (see application guide).
Security Markings: Are preferably placed centered in the top margin.
Photographs: Photos are not normally permitted; black and white photos may be submitted where an ink drawing won’t properly illustrate the invention. Color drawing photos are only accepted if they go through the same patent applications process as color drawings.
Conclusion
Good drawings that show how your invention works are essential to a successful patent applications. All drawings have to be submitted when you first submit the patent application, otherwise, they are what the patent offices calls “new material,” which is prohibited.
All of the above is only a summary of all the rules: the rules are clear, but they are somewhat complicated. You can see some samples of patent drawings here. Or you can leave the drawings to us and feel confident that your drawings will be done in accordance with all the relevant specifications.
Our team of patent illustrators have created over 7,000 patent illustrations, mostly for the US and European Patent Offices.